Why aren't people being enrolled in my sequence after publishing a play?
Last updated: May 1, 2026
Context
When running a play to enroll contacts in a sequence, you may notice that some or all contacts are not being enrolled as expected. There are several common reasons why sequence enrollment may not occur.
Important: Audiences are dynamic and change in real-time as contacts move in and out based on the audience criteria. However, play logs and enrollment records are static snapshots from when the play was executed. This means you may see fewer contacts in an audience than were actually enrolled in sequences, as contacts may have moved out of the audience after enrollment occurred.
Answer
Here are the main reasons why contacts may not be enrolled in sequences, and how to resolve each case:
Sequence is Paused
Before investigating other enrollment issues, verify that your sequence is active and not paused. Paused sequences will queue enrollments but won't process them, which can appear as a backlog of contacts waiting to be enrolled.
To check and resolve:
Open the sequence in question
Check the top right corner of the sequence interface for a "Paused" indicator
If paused, click to unpause the sequence
Queued enrollments will begin processing automatically once the sequence is unpaused
Note: The paused status indicator can be easy to miss, so always verify the sequence status when troubleshooting enrollment issues.
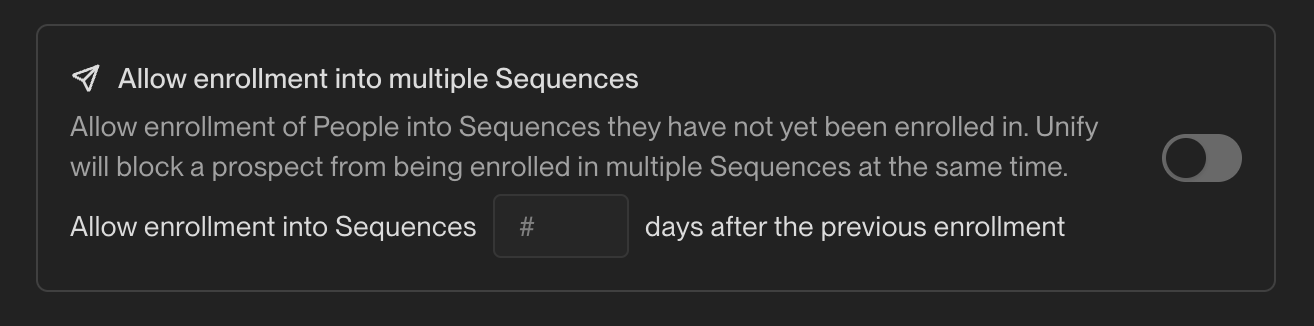
Recently Enrolled in Another Sequence
By default, Unify prevents enrollment in multiple sequences. If contacts were recently enrolled in another sequence:
Go to Settings > Organization > Sequences > Rulesets
Enable "Allow enrollment into multiple Sequences"
Set the minimum number of days to wait between enrollments
Global Exclusions
Global exclusions are configured at the sequence level and take precedence over audience-level exclusion settings. Even if you disable exclusions when uploading an audience, contacts may still be excluded if global exclusions are enabled. These sequence-level exclusions apply universally to all enrollments for that sequence.
Important Technical Limitation: When using CRM‑based exclusions (such as “last activity date”), be aware that Unify’s email activity writeback can trigger CRM automations that update these fields, potentially causing contacts to be excluded or unenrolled even from the same play that just sent them an email. This can happen minutes after enrollment during sequence execution. Exclusions are evaluated continuously during sequence execution at send time, not just at enrollment. To prevent this, either toggle off “Exclude from Sequences” for activity‑based exclusions or adjust your CRM automation settings.
Note: Contacts may appear as "queued" in sequences even when they match exclusion criteria. This is expected behavior - exclusions are evaluated at send time, not just at enrollment. Contacts matching active exclusions will be automatically skipped when the sequence attempts to send, so seeing them in "queued" status does not mean they will receive emails. To ensure exclusions work properly, verify that exclusions are toggled on at both the organization level (Settings → Organization → Exclusions) and within the sequence ruleset settings.
CRM Sync Timing Limitation: Play triggers evaluate exclusions against data that has already been synced from your CRM into Unify. Both CRM sync and play triggers run on approximately 15‑minute cycles, but they must happen in the correct order for exclusions to work properly. If a contact's CRM data changes (such as an opportunity being created) close to when a play fires, the updated exclusion data may not be in Unify yet at evaluation time, causing the contact to be enrolled despite matching exclusion criteria. This is a fundamental limitation of the polling‑based sync architecture. To minimize this risk for high‑priority plays, add a short delay node (15‑30 minutes) at the start of your play workflow to give CRM data more time to sync before exclusions are evaluated.
Understanding Proactive Unenrollment: The proactive unenrollment toggle (available in the advanced settings of each exclusion) automatically removes contacts from active sequences when they match exclusion criteria mid‑sequence. While this is useful for exclusions like “opportunity opened” or “became customer,” you should keep this toggle OFF for activity‑based exclusions like “last sales activity.” Since Unify’s email activity writeback updates these fields in your CRM, enabling proactive unenrollment for activity‑based exclusions would cause contacts to be removed from sequences immediately after Unify logs their email activity—defeating the purpose of the sequence.
Multi-CRM Opportunity Evaluation: When using opportunity-based exclusions (such as "Active Opportunities"), Unify evaluates opportunities from ALL connected CRM systems, not just your primary CRM. For example, if you have both Salesforce and HubSpot integrated, a contact may be excluded due to an active HubSpot opportunity even if their Salesforce opportunities show as Closed Lost. To view all associated opportunities across CRMs, scroll down on the account record in Unify to see opportunities from all connected systems. When troubleshooting opportunity-based exclusions, always check for active opportunities in every integrated CRM, not just your primary system.
Company-level exclusions automatically exclude all contacts within those companies - you don't need to create separate exclusions at the contact level. All exclusion lists are global by default and apply to every sequence enrollment unless specifically disabled for individual audiences. When reviewing exclusion counts in the UI, remember that company-level exclusions display the total number of people excluded (all contacts at those companies), not just the number of companies in your exclusion list.
Navigate to Settings > Organization > Exclusions
Review enabled exclusions that may be blocking enrollment
Understand the two‑tier exclusion system:
Global level: Each exclusion has an “Exclude from Sequences” toggle in Settings → Organization → Exclusions that applies across all sequences
Ruleset level: Each ruleset can have sequence‑specific toggles for individual exclusions
Both levels must be configured correctly – disabling an exclusion in a ruleset won’t work if the global “Exclude from Sequences” toggle is still enabled on that exclusion
Example: To exclude prospects with open opportunities, you must enable the ‘Open Opps’ exclusion at both the global level (Settings → Organization → Exclusions) AND at the ruleset level for each sequence. Enabling only the global exclusion will not prevent these prospects from remaining in sequences or appearing in tasks. Modifying ruleset exclusions typically requires admin-level permissions.
To disable an exclusion for a specific sequence:
First, go to Settings → Organization → Exclusions and toggle off “Exclude from Sequences” for the relevant exclusion
Then, go to the Ruleset settings and toggle off the sequence‑specific toggle for that exclusion
Wait ~30 minutes for changes to take effect before re‑running the play
Remember that you can also disable exclusions for specific audiences during the audience upload process if needed
Toggle off any exclusions that shouldn't apply to your sequence, or refine exclusion criteria to be more specific (e.g., filter by sequence type rather than any sequence enrollment)
Note that common exclusions like "Any Associated Deal" may be preventing enrollment even if similar exclusions were disabled at the audience level
Critical Setting Distinction: The “Allow enrollment into multiple Sequences” toggle controls enrollment across different sequences only. To re‑enroll contacts into the same sequence they were previously in, you must also enable the “Allow re‑enrollment into the same sequence” toggle in the same Ruleset settings. Both toggles must be on when you need contacts to re‑enter the same sequence. If contacts were never enrolled in that sequence (only excluded), this second toggle is not required—they will enroll automatically once exclusions are cleared.
Creating Company-Based Exclusions:
Click "Create New Exclusion" and select Companies as the exclusion type
Add a domain filter using contains one of and input the company's domain (e.g., "example.com")
When entering multiple domains in the same field, separate them with commas (e.g.,
competitor1.com, competitor2.com, competitor3.io). Do not includehttp://orwwwprefixes—use only the root domain.Understanding Exclusion Counts: When viewing company-level exclusions in the UI, the "Excluded Count" shows the total number of people who will be excluded, not just the number of companies. This count will be significantly higher than your company list because it includes all contacts associated with those companies. For example, excluding 86 companies might show an excluded count of 1,368+ people if those companies have multiple contacts in your system. This is expected behavior—company-level exclusions automatically exclude everyone at those companies.
Note: Companies won't appear in the exclusion interface until they exist in your CRM or have been deanonymized via web intent. However, the exclusion will still work correctly once those companies are added to your system – you don't need to wait for them to appear before creating the exclusion.
Enable the proactive unenrollment setting to automatically remove contacts from existing sequences that match the exclusion criteria (note: this toggle is available for all exclusion types, not just company-based exclusions)
Ensure domain filters match exactly – company‑level exclusions only check the company's domain field, not individual email domains. Domain variations (e.g., “gradient‑labs” vs “gradientlabs”) must be added separately as they won’t match automatically. Consider creating both company‑level and person‑level exclusions for comprehensive coverage.
Tip: For CRM users (HubSpot, Salesforce), you can also opt out the company in your CRM and configure field mapping in Unify to sync opt‑out fields globally across all audiences and sequences.
Important: If a contact is associated with multiple company records in your CRM (e.g., duplicate HubSpot companies), company‑level exclusions may not work as expected. If ANY of the associated company records don’t match the exclusion criteria, the contact can still be enrolled. To resolve this, check for and merge duplicate company records in your CRM to ensure exclusions apply correctly.
Note: Contacts may appear under exclusion criteria in the interface even when those exclusions are disabled or not actively blocking enrollment. For example, a contact will always show under "sequenced less than 60 days ago" once they've been enrolled in any sequence, but if this exclusion is unchecked, it won't prevent their enrollment or cause unenrollment.
Important: Be specific with sequence-related exclusions. A broad "currently in sequence" exclusion will block enrollment even for call-only sequences or sequences from other platforms like HubSpot. Consider using more targeted exclusions based on sequence type or recent email activity instead. Note that Unify automatically prevents contacts from being enrolled in multiple Unify sequences simultaneously, so you don't need to create exclusions specifically for this purpose.
Important: After disabling sequence-level exclusions, you must wait 30 minutes for the changes to take effect before re-running the play to enroll previously excluded contacts. Additionally, do not re-enable these exclusions until all affected contacts have completed the entirety of their sequences, as re-enabling exclusions prematurely can cause unenrollment.
Note: If individual contacts are removed from exclusion lists (rather than disabling entire exclusions), they will automatically be enrolled in active sequences if they fit the audience criteria and the audience is actively enrolling. No manual re-enrollment is required in this case.
Contacts won't be enrolled if there's no valid routing path for their persona. To fix this:
Edit your play's sequence enrollment node
Add routing for all relevant personas
Consider adding an "Everyone else" routing option to catch contacts that don't match specific personas
No Routing Target
"No routing target" - This indicates contacts weren't enrolled because there's no valid routing path configured for their persona. To resolve this:
Check your persona routing settings in the play configuration
Ensure all personas used by your target contacts have corresponding routing rules
Verify that the routing targets (users, teams, or queues) are still active and properly configured
For persona-specific sequences (like New Hire sequences): Verify that the target personas are enabled in the corresponding settings (e.g., Settings > New Hire Settings for new hire personas). Personas must be tracked in these settings to allow enrollment, even when routing is properly configured in the play.
Important timing clarification for New Hire persona settings: Changes to persona settings (including excluded titles) only take effect on the next New Hire Tracking signal refresh and are not applied retroactively to previously detected new hires. If you see contacts with excluded titles in your tracking, they were likely detected before you updated your exclusion rules.
Prospecting Node Configuration
When using prospecting nodes in your play workflow, proper node sequencing is required for successful sequence enrollment:
Add a loop node after the prospecting node – this is required before connecting to sequence enrollment
Connect the sequence enrollment node after the loop node – do not connect sequence enrollment directly to prospecting
If nodes won’t connect properly – delete the existing nodes and recreate them in the correct order:
Prospecting node → Loop node → Sequence enrollment node
Note: If you created the workflow nodes in the wrong order initially, you may need to delete and recreate them to establish proper connections between prospecting and sequence enrollment.
Best Practice: When configuring the “Maximum enrollments per company” setting, start with 2‑4 contacts per company as a baseline. Avoid exceeding approximately 7 contacts per company, as targeting too many people from the same organization can negatively impact email deliverability and sender reputation.
If contacts were previously excluded from enrollment, the play won't automatically retry them. Similarly, unenrolling contacts from a sequence will not cause them to automatically re‑route back through the play. To resolve this:
Important: Re‑enrolled contacts resume at their next step in the sequence, not from the beginning. If you need contacts to start over, create a new sequence or duplicate the existing one.
Duplicate the existing play
Ensure the re-enrollment setting is enabled in Settings > Organization > Sequences > Rulesets to allow previously blocked contacts to enter the new sequence
Update any necessary settings or routing
Run the new play to attempt enrollment again
Contacts Still Enrolled in Deleted Sequences
If you've deleted an old sequence but contacts remain enrolled (preventing enrollment in new sequences), you have two options to move them to a new sequence:
Option A - Using Enrollment History:
Create an audience: Person Enrolled in "[Old Sequence Name]" (Anytime) where Status = Canceled
In Settings > Organization > Sequences > Rulesets, enable "Allow re‑enrollment into Sequences" and set the wait to 0 days for immediate re‑enrollment
Create or duplicate a play that enrolls into the new sequence, set the audience from step 1 as the trigger, and publish it
Option B - Using CSV Upload:
Export or compile a CSV of the contacts you want to move
Upload the CSV as a new list and wait for processing
Enable re‑enrollment rules as above (set wait to 0 days if needed)
Create or duplicate a play that points to the new audience and enrolls into the new sequence
5. To manually enroll contacts from the list into a sequence: select all contacts using the top left checkbox, then click "Add to sequence" at the bottom right
Note: Deleting a sequence does not automatically unenroll contacts from that sequence, which can block them from being enrolled in new sequences due to multiple enrollment prevention rules.
Cancelled sequences have the same blocking behavior as deleted sequences: contacts remain enrolled in a cancelled sequence and are prevented from enrolling in new sequences due to multiple enrollment prevention rules. The same solutions—using enrollment history or a CSV upload, enabling re‑enrollment settings, and creating a new play—apply.
Best Practice: Before publishing a play, always verify that persona routing is properly configured and all necessary exclusions are set up as intended. This helps prevent failed enrollments that require re-running the play.
Manual Re‑enrollment for Individual Contacts
Once you've updated your organizational settings to allow multiple sequence enrollment, you can manually re‑enroll individual contacts:
Important: Re‑enrolled contacts resume at their next step in the sequence, not from the beginning. If you need contacts to start over from step 1, you must create a new sequence or duplicate the existing one.
Navigate to the People tab
Click on the contact's name to open their profile
Click “Enroll” at the top right of their profile page
Bulk Manual Enrollment from Lists: If you've uploaded contacts via CSV (which creates a list), you can manually enroll multiple contacts at once by navigating to the list, selecting all contacts using the top left checkbox, and clicking "Add to sequence" at the bottom right.
Understanding Bulk Manual Enrollment Progress:
When using the "Add to sequence" feature to bulk enroll contacts from a list, you may see partial completion (e.g., "390 / 941 enrollments attempted"). This is expected behavior – not all selected contacts will successfully enroll due to the same eligibility rules that apply to play‑based enrollments:
Re‑enrollment cooldown periods
Already enrolled in another sequence
Global exclusions
Mailbox or sequence sending limits
Company enrollment caps (maximum enrollments per company)
To diagnose why specific contacts weren't enrolled during bulk manual enrollment:
Open the target sequence → go to Enrollments tab
Click into the "Not Enrolled" count to see the breakdown of failure reasons
Review per‑contact reasons (e.g., "recently enrolled," "already in another sequence," exclusions, mailbox limits)
If you recently changed re‑enrollment rules or exclusions, wait 30–60 minutes for changes to propagate, then retry the bulk add
If the mailbox's daily send limit is reached, contacts will sit in "Queued" status and continue automatically as capacity frees up
Reassigning Outboxes for Queued Enrollments
If you need to change the outbox (mailbox) for contacts who are already queued in a sequence—for example, to bypass rate limiters or redistribute sending across multiple mailboxes—you can reassign enrollments without re‑running the play:
Navigate to Email Backlog
Scroll to Reassign Sequence enrollments
Click Reassign Enrollments for your target sequence
Select the new mailbox(es) you want to use
Save your changes
Important: This feature only works for queued enrollments that haven’t been sent yet. Emails that have already been sent or are currently being processed cannot be reassigned to a different outbox.
Note: If contacts have already completed or been unenrolled from the sequence, you’ll need to use the standard re‑enrollment process described earlier rather than the reassignment feature.
Critical Technical Limitations Not Covered by Standard Settings
Simultaneous Enrollment Prevention: Unify automatically prevents contacts from being enrolled in multiple sequences simultaneously – this cannot be overridden regardless of your organizational settings. Contacts must complete or be manually unenrolled from their current sequence before entering a new one.
Out of Office Response Impact: Sequences are automatically marked as “complete” when any reply is received, including automated Out of Office responses. This can prevent re‑enrollment in the same sequence even when the “Allow enrollment into multiple Sequences” setting is enabled. If you need to re‑enroll contacts who received OOO responses, you may need to adjust your re‑enrollment rules in the email settings or create a new sequence for these contacts.
Important System Clarifications
Global Settings Only: Sequence enrollment settings are configured globally and apply to all sequences in your organization – they cannot be customized for individual sequences.
Unenrolled Contact Status: When contacts are unenrolled from a sequence, they should not remain blocked from future sequence enrollments. If you're experiencing issues where unenrolled contacts cannot enter new sequences, verify your re‑enrollment settings and ensure the contact has fully completed or been unenrolled from any previous sequences.
Play Re-run Cool-down Limitations
Important Technical Limitation: Play re-run cool-down periods cannot be set to 0 days—the minimum is 1 day. If you need to immediately re‑execute a play on the same audience without waiting for the cool‑down period, duplicate the play and run the duplicate instead of re‑running the original. This play‑level cool‑down is separate from sequence re‑enrollment settings and affects all play types regardless of their workflow configuration.
Navigate to your play in the Play Builder
Click the three‑dot menu and select “Duplicate”
Rename the duplicated play for clarity (e.g., “Original Play Name – Retry”)
Publish and run the duplicated play immediately
The duplicated play will process the same audience without any cool‑down restrictions
How to Diagnose Enrollment Issues
To identify why specific contacts weren’t enrolled:
For bulk diagnosis:
Open the Play you ran → go to Metrics → click the Sequence node (or the “Not Enrolled” count)
Review the list of contacts and their specific failure reasons
Check the Execution Logs tab in the Play Builder for detailed enrollment attempt records
For individual contacts:
Open the contact’s record → Activity tab
Look for Play/Sequence entries showing the enrollment attempt and reason for failure
If you see a Play run marked as “not enrolled” with a failure reason of “already enrolled” or “recently enrolled,” this indicates the contact was excluded due to re‑enrollment rules
Note: If the Play is configured to only run once per contact (in Play settings), contacts who previously ran through the Play won’t show new activity in their Activity tab, even if they match the audience criteria again. Check the Play’s Logs tab for historical enrollment data to verify if a contact was previously processed.
Check the contact’s Exclusion tab in their record to see exactly which exclusion criteria they fall under.
Note: There is currently no automated way to see exactly why a specific person didn't go through a play in bulk. You must check individual contact records or review play logs to diagnose enrollment failures.
Alternatively, create a test audience using the prospect’s email and toggle exclusions off/on during audience upload to see which exclusion applies
Critical Timing Considerations
Processing Delays: After disabling exclusions or making changes to CRM field values, wait approximately 30 minutes for the changes to process before re‑running your play. Exclusion updates are not applied immediately and may take 15–30 minutes to propagate through the system before taking effect on new enrollment attempts.
Global Exclusion Impact: Global exclusions block all enrollment methods, including manual enrollment attempts via the browser extension. Even if you disable exclusions at the audience level, contacts matching active global exclusions cannot be enrolled through any method. If you need to immediately enroll a contact who matches a global exclusion, you’ll need to temporarily disable that specific global exclusion and wait 30 minutes before attempting enrollment again.
Tip: If you’re unsure which exclusion is blocking a specific contact, check the contact’s Exclusion tab in their record for the most direct diagnosis.
Default 90‑Day Waiting Period Specification
When the “Allow enrollment into multiple Sequences” setting is disabled (the default state), Unify enforces a 75‑day waiting period between sequence enrollments.
Waiting Period Calculation from Unenrollment Date
The re‑enrollment waiting period is calculated from when contacts were unenrolled from their previous sequence, not from when their last sequence action occurred. This includes manual unenrollments and cancellations.
Contacts enrolled 60‑80 days ago may still be ineligible if they were unenrolled more recently.
Filtering audiences by “finished > X days ago” can be misleading since cancellations and unenrollments may have occurred after the last sequence step.
When manually unenrolling contacts to start new campaigns, the waiting period clock resets from the unenrollment date.
Example: If you set a 7‑day waiting period and unenroll contacts from a sequence to start a new one, those contacts won’t be eligible for re‑enrollment until 7 days after the unenrollment date, even if their last sequence step was completed weeks earlier.